
It is recommended that carburettor balancing is carried out every 8,000 miles. I've found that on my ST1100 they don't really need balancing that often, but it really doesn't take that long to do.
The reason for this balancing is that if one carburettor is opened further than the others, that cylinder will run hotter; the other carbs will supply a richer mixture to compensate, and fuel economy and performance will suffer.
Apart from a set of vacuum gauges, you'll also need the following tools for carburettor balancing:
- A PZ2 screwdriver with a blade 250mm long - actually, the adjustment screws are not really PZ2 but JIS (Japanese Industrial Standard); however the PZ2 fits well enough.
- A pair of needle nose pliers (to remove the clips from the blanking caps)
- Some spare "Self-Tightening Wire Hose Clamps", 8mm in diameter - have a look in your local motor factors for these. Why? They tend to fly off and disappear very easily, so be warned.
When I had my Yamaha, I purchased a Morgan Carbtune:
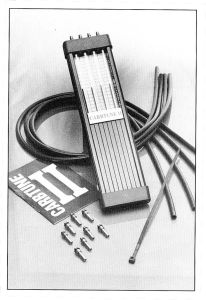
The nice thing about these carburettor balancing devices is that they will work on any multi-carburettor engine, so I didn't have to change anything in order to use it on the ST1100. In fact, I no longer even need to use the adaptors which the Yamaha required.
There are several makes of carburettor synchronisers available, but from reading several reviews it appeared that the Carbtune was more accurate (the Carbtune Pro is now available, replacing the Carbtune II which is shown above).
It's advisable to carry out the carburettor balancing as the last job of a service i.e. once the engine oil and filter have been changed, spark plugs and air filter examined, and idle speed set.
How to use the Morgan Carbtune
Once you've got the Carbtune's rubber pipes cut and set up according to the instructions which come with it, you're ready to start. The seat and false tank cover need to come off, obviously, as do the air duct/maintenance covers. The Haynes manual states that you need to remove the fairing pockets. This is only necessary the first time you do this job; once you've carried out the tuning once you'll know where the throttle screws are; and the vacuum hose blanking caps can be accessed from the side.
Disconnect the number 3 cylinder vacuum hose from the back of the fuel tap. Attach a separate length of pipe to the back of the fuel tap, apply a vacuum to it, then clamp it off (I use a short length of fuel pipe which I bend double and clamp with a small jubilee clip).
Remove the blanking caps from the remaining three carburettors, and connect the appropriate rubber pipes from the gauge to the vacuum hoses. Start the engine, running it until the temperature gauge starts registering. (Obviously don't do this in an enclosed space!)
The vacuum readings for all cylinders should be the same. Don't worry too much about what the reading is; you just want the steel indicator rods in the gauge to be within one graduation of each other.
If the vacuum readings vary, synchronise carburettor number 2 to carburettor number 4 using the adjustment screw between the two carburettor bodies. Carburettor number 4 is the "base carburettor" - in other words, each of the other three carburettors are synchronised to this one. The synchronisation can be done with the engine running; just be careful when turning the screw not to press down too hard as this will give you a false reading. Just turn the screw approximately a quarter of a turn. I inevitably turn it the wrong way and have to reverse the adjustment I just made! Remove the screwdriver, open and close the throttle quickly, and examine the two carburettor readings again.
Once the gauge shows the vacuum readings to be roughly level, carry out the same procedure by comparing carburettors 1 and 4. You will notice that the right-hand carburettors have two adjustment screws between them. The front-most screw adjusts carburettor number 1, and the rear screw adjusts carburettor number 3.
Once carburettors 1 and 4 are balanced, carry out a comparison between number 3 and 4 (using the rearmost screw to adjust carburettor number 3.
Don't worry that the engine will overheat as you're taking too long to carry out this procedure; the electric fan will kick in once the engine reaches operating temperature.
You may need to carry out the above procedure a few times before you get the carburettors nicely balanced. Once you're happy, switch off the engine and remove the Carbtune. Replace the blanking caps on the vacuum hoses, reconnect the number 3 cylinder vacuum hose to the rear of the fuel tap and replace those tiny spring clips - including those that have disappeared! Finally reinstall the tank cover and seat. Your carburettor balancing job is done!